Tuesday, November 28, 2006

Dimming floodlights with a microcontroller


Trying to design a scheme that would independently run my display lights for a Halloween display project, I've used a hacked dimmer switch, a Picaxe 08M microcontroller, a white LED and a light dependant resistor (LDR) to brighten and dim floodlights.

One of the problems I've encountered making animatronic displays is control of the lighting. I'm using an older version of Brookshire Software's RAPU unit which only has control of sixteen devices. Since the best use of such a control device is the control of the animatronic's servos (moving the animatronic's eyes, mouth, etc.) using several of the channels to control lighting seemed like such a waste.

The solution was to have each support effect (lights, smoke machines, etc.) run independently from the RAPU contol unit. Using the Picaxe 08M microcontroller to send PWM pulses to the LED, the LDR changes the resistance of the commercial dimmer and allows the microcontroller to control the floodlights with reasonable accuracy.

The Picaxe's program waits for a certain pin to be pulled high, and when that happens the program controlling the LED's light level starts, runs through its routine, and then stops, waiting for another pulse. A 12 VDC relay is used to pull the microcontroller's pin high, and this relay is connected to a switch controlled by one channel of the RAPU control unit.

Using this scheme, I can have several floodlights, smoke machines, etc., all "waiting" for a single 12 VDC pulse from the RAPU unit, and, once received, each remote device will independently run its own program.

As with any project that uses 120 VAC be careful as mains current can kill you!

Saturday, November 25, 2006

Wonderflex

How to build a body for an animatronic? When I was in grade school I'd made some "scary" dummies out of chicken wire, duct tape, old clothes, cheap Halloween masks and even cheaper wigs. It was the only technology I knew.

Later on a friend and I put together some special effects for another friend's Halloween party, and I must have made ten chicken wire/duct tape dummies. It works but your hands wind up looking like you tried to pick up a feral cat with your bare hands!

Using chicken wire/duct tape shells closes in your design, making it very difficult to get back inside the animatronic when something breaks or needs adjustment. I even tried using cut up pieces from old 2 liter water containers, but the problem was still that this techinque limited or eliminated the ability to easily get back inside the animatronic.

Salvation came from an unexpected source. I email regularly with my friend Stan in Ontario, Canada, and he turned me on to a material known as "Wonderflex".

A quote taken directly off of the internet:

Wonderflex looks like a piece of plastic, but it becomes soft and malleable when heated. It can be shaped by hand or over a mold while hot. Once it cools down it hardens retaining the shape. It can be re-heated and reshaped as many times as necessary, or worked in sections. It glues to itself if enough pressure is applied. It can be cut with scissors and finished with paint, gluing fabric on top, or any other method. It can be heated with a heat gun, a microwave oven, or dipped in hot water.

This stuff sounded too good to be true, so I ordered some. This stuff is great!

I purchase Wonderflex from Dazian Fabrics, but only because I get next day delivery via UPS Ground. Google Wonderflex and you can find it from many sources.

The product comes in 39" X 57" sheets .035" thick. I bought a mannequin off of Ebay and got into the sheet molding business:


Cutting a piece to fit, I got out my industrial heat gun and went to it. As the Wonderflex gets hot, it gets very flexible, and very easy to drape over a form and press into place, because the Wonderflex gets so hot heavy duty gloves are used to smooth the product into place and smooth out any wrinkles.


The procedure is basically cutting out pieces of Wonderflex and heat-gunning them to your form. Since one side of the Wonderflex has an adhesive, it readily sticks to itself when it's hot. I found that rather than cutting out smaller pieces using as large of a piece that you can handle makes the "skin" cleaner and more professional looking. However, in areas that need to be stronger multiple layers of Wonderflex works very well in stiffening the skin.


Once the skin has been hand molded onto your form, it's just a matter of using a utility knife to cut various parts off of your mold.


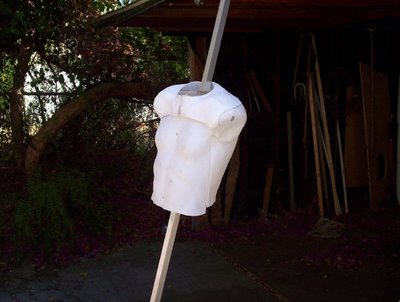
Here I've cut off the chest/stomach part and bolted it to an aluminum strip.


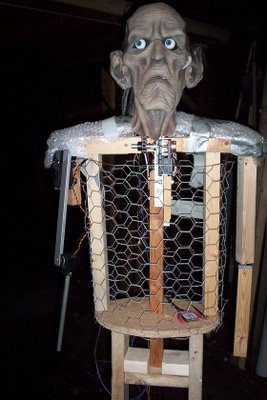
Attached to Clod's wooden frame, the Wonderflex skin is a marvelous replacement for chicken wire/duct tape shells.

On another project I combined the Wonderflex skin idea with an aluminum frame, producing a very light weight but sturdy design:


Using aluminum frame elements eliminated the dead weight of using a wood frame, and making the aluminum support struts was fairly straight forward.


Since this project was a ghoul rising about ten feet in the air, weight was an important consideration. Using the Wonderflex/aluminum frame concept, I was able to design a "ghoul" that weighed less than 25 pounds.


Here is a photo of the ghoul's framework while the lift mechanism is being tested. As you can see the framework is pretty much empty space, and certainly allows getting "back inside" the animatronic if something needs to be tightened, fixed, etc.

Clod the gravedigger


My first animatronic was Clod the gravedigger. This whole thing started with my attempt to build a set of animatronic eyes. I'm not even sure why I wanted to build animatronic eyes, but one thing led to another and, well, I started building these things.


I'd seen some animatronic eyes on the internet, and the first build was an attempt to duplicate the ones I'd seen. Unfortunately using this design produced a mechanism that broke if you looked at it too hard.


Using my own design the second set of eyes are rugged and alot easier to build. The second eye design came late in the project, so the following photos still have the original eye design.


I'd found a mask that I wanted to use, so the framework for the head came first. And, of course, I wanted the head to be able to turn left and right, and the head to nod up and down, so the design started to get somewhat complex.


This shot shows the head mechanism with four servos: one for the head turning left/right, one for the eyes looking left/right, one for the eyes looking up/down, and the mouth servo. The fifth servo for the head assembly is connected below this shot connected to the chain drive shown at the bottom of the photo.

This is the final design of the head mechanism. The circular white disk in the lower part of the photo is the geared-up servo that has enough torque to have the head nod up and down via the chain drive. My insistence that the animatronic have a head that could nod up and down became an expensive whim, as the cost of the servo and mechanism that had enough torque wound up costing me over $150.


Clod and friend.

Friday, November 24, 2006

Faux stone pillars


One of the features of my 2006 Halloween display was a graveyard scene, and of course a graveyard has to have a graveyard fence. The "wrought iron" fence segments were made from furring strips and 1/2" PVC pipe, painted flat black they looked OK.

The bigger challenge was to build the graveyard fence support pillars. I'd seen some stone pillar builds using building insulation panels but had never tried to build any.


All the pillars were constructed from 1" X 1" stock, 2" X 4" 's and furring strips; the foam panels were held in place using construction adhesive.


This pillar housed a CD player and speakers, so the graveyard scene had the appropriate spooky sounds.


Shaving down the foam panels was very messy, afterwards it looked like it had snowed inside my garage!


The individual grout lines were hand-carved using a utility knife at 45 degree angles, and then textured by CAREFULLY using a propane torch passed over the foam slabs quickly; too fast and the flame wouldn't texture the foam, too slowly and the flame would burn right through the foam! Then, each pillar was painted grey, and then "speckled" using white and black spray paint cans whose nozzles had been munged up with a pin so that the paint spray came out more as paint splatters than a smooth spray, this sorta simulated a granite surface.


Then the grout lines were painted in with white paint. At night the pillars looked very realistic.

Tuesday, November 21, 2006

LED candle replacement


For some displays (Halloween, Christmas, etc.) the effect of candles in the display is desired, but the fire danger of using actual candles outweighs their use.

Someone has solved this problem elegantly using LED's. LEDtronics sells a product they bill as "Flameless LED Candle Flickers Like a Real Candle", and they really do look like real candles flickering in the breeze.


These "candles" are available with a frosted plastic sleeve and the LED unit itself. The LED unit can be used by itself, but the frosted plastic sleeve diffuses the LED unit's output making the resulting "candle flicker" so much more realistic.


The LED unit runs for days on just two AAA batteries. If you want to have a flickering candle effect in your display please consider using this product. Looking at several of these LED devices at night it's hard to tell that they're really not real candles. Price approx. $20 for five candles.